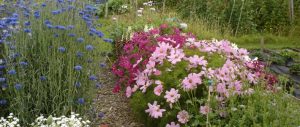
A vase of fresh flowers straight from the garden can instantly make a house feel more like a home and growing cut flowers yourself is easy if you choose the right plants and will save you £££ at the florist. You don’t need to set aside a special area of your garden – you can simply mix the plants in among your herbaceous borders, or grow some in containers outside the back door. You can even add a few rows to your vegetable plot.
This year we are growing a selection of plants recommended for cutting, both annuals and perennials. Our selection includes Cosmos – a dozen varieties including ‘Chocamocha’, the chocolate scented variety, Carthamus tinctorius Grenade, Echinacea Hot Papaya, Achillea ‘King Alfred’, Calendula, Sweet peas, Gypsophilia, Scabious ‘Fama Deep Blue’, Verbena bonariensis ‘Lollipop’, various Delphinium, Cleome ‘Senorita Carolina’, various Pentstemon, Lavenders, Ammi majus & visnaga, Panicum elegans “Frosted Explosion”, Cerinthe major and various nicotiana to name a few that you can choose from.
If you’ve been thinking about creating a cutting patch here are a few tips to get you started:
Choose your plants
Think about what types of flowers you want to grow—both annuals and perennials—and make a list. We will have a section earmarked as suitable for the cutting garden to make life easier. To start out, consider limiting the varieties to a manageable half-dozen as a guide, depending on the plants you choose, a three-by-six-foot bed can hold up to about 20 plants.
Choose your spot and prepare the plot
Most cutting flowers prefer lots of sun—so to allow for the most variety pick a sunny site that is well drained. A cutting garden isn’t supposed to look like a mixed border of plants, so there’s no need to get hung up on design principles. Think of it more in terms of crops – you’ll be planting in rows like the veg plot. If you’re making a new bed, dig over the area and then work in about a 5 inch layer of organic material (compost, chopped leaves, peat moss, etc.) into the top eight to ten inches of soil. If your ground is very sandy, swampy, or rocky or high in clay content, do yourself a favour and consider making a raised bed and fill with a good soil and compost mix. This saves you the daunting, near-impossible task of trying to turn bad soil into good.
Plan the layout of the plot
Create a simple sketch of the bed on paper and decide how many of each kind of plant you want. Don’t forget to allow enough space for spread of the different varieties and for you! There has to be enough room between rows to get in there to weed, deadhead, stake, and, of course, harvest. Err on the conservative side with your initial purchase, you can always add more plants if you prove to have the room and there may be new varieties available on your next visit to the Nursery. Feel free to ask if you have any questions on growing tips for the plants you have selected.
Planting
Planting can begin after the last frost. Just before you plant, mix some granular slow-release fertilizer into the top few inches of soil. This will help keep nutrition consistent during the growing season. For easy maintenance, group together flower varieties with similar sun, water, and drainage needs. Tall plants should be placed in the back of the bed so they won’t shade out their shorter neighbors. Once everything is in the ground, water each plant carefully and thoroughly to settle it in. Then spread a 2/3 inch layer of mulch such as shredded bark around the plants, this will suppress weeds and help retain moisture.
Tooling-up
You will need to assemble a cutting kit that includes sharp scissors, by-pass pruners and a small hammer for smashing woody stems. You will also need a supply of stakes, probably 3’ bamboo canes would suffice and a roll of garden twine for supporting top-heavy stems and propping up foliage that could be broken by rainstorms.
Maintaining
Throughout the growing season plants need consistent moisture, so it the weather fails to give us at least one inch of rainfall per week, you will need to water by hand. To give heavy blooming plants a boost—especially later in the season when they tend to slow down—every couple of weeks apply a liquid fertilizer dissolved in water.
Let Snipping begin….
Do your cutting during the coolest part of the day—early morning—and have a container of tepid water with you. Plunge the stems into the water immediately after snipping them to prolong their vase life. When you’re back inside and ready to start arranging, make a fresh cut on the stems and add a cut flower feed/preservative to the water to further prolong their lives. If you choose you can make your own feed from the recipe below:
- one litre of water
- one tablespoon of vinegar
- one teaspoon sugar
- three to five drops of household bleach
Stir the water thoroughly before adding the flowers.
Cutting stems regularly and removing faded blossoms will encourage plants to keep blooming as frequently and for as long as possible.
Finally, enjoy the results of all your hardwork!